3D Art: Modeling, Texturing, Printing, and more
In 3D Art, students are eager to bring their creativity into the 3rd dimension. This has been the very first time I’ve offered this class at Appamada School, so naturally I was excited to see what these crafty young artists had in store. In this digital art class, students are learning Blender - 3D modeling software that allows users to build virtual geometry to create three-dimensional forms, then decorate them with textures, lighting, animations and more. Blender is widely used in both independent and professional projects, including video game development, film, cartoon animations, architecture, and so on. The end result of a 3D modeling project might be an object, a character, a scene; you name it. In 3D Art, our imagination is the limit.
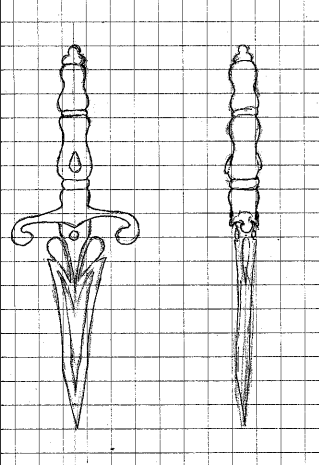
For our first major project, I had students conceptualize an original 3D prop as a paper sketch to later bring into reality as a fully textured 3D model. Students came up with plenty of unique ideas during this brainstorming phase, such as fancy treasure chests, fantastical swords, magical staffs, and so many more. Once they landed on an idea they felt confident about, students drew out model sheets - a technique used to proportionately illustrate a subject from multiple perspectives. You often see this practice in the animation industry, where 2D artists initially draw out characters in order to clue in the 3D modelers and animators on what the character might look like from different angles. I encourage students to spend a lot of time drawing and planning out how their proposed prop will look in 3D space, as working with an established reference image will prove to be significantly helpful when piecing together the shape and proportions of the 3D model.
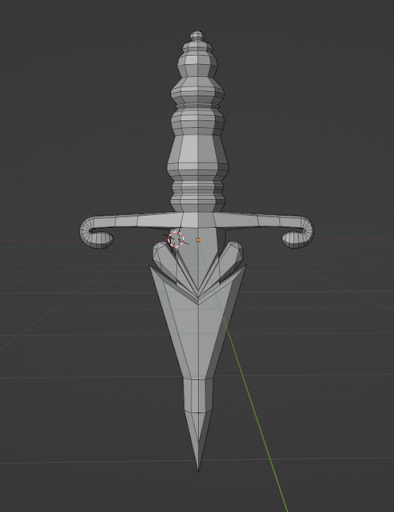
The 3D modeling process begins with shape blockout, a technique in which the modeler identifies the most basic shapes their subject is composed of (say, a basic cylinder for a water bottle) before adding in the detail, like the ridges of the bottle. Using their model sheets and reference material, students began building out the base shapes of their prop, then explored techniques to morph and sculpt their geometry exactly how they wanted it to achieve the visually appealing forms they had initially envisioned.
Once the form of their prop was complete, it was time for students to texture. This is the process of applying visual detail to the surface of the model, including patterns, imprinted designs, shininess, grunge, reflectiveness, and so on. This is perhaps the most abstract stage of the process, as texturing a 3D model is accomplished by first “unwrapping” the mesh, a process in which the modeler flattens out their model in order for its surface details to be stored as a 2D image file.
My approach to guiding students through this tricky process to visualize it with physical papercrafts. In this hands-on activity, students learned that, much like a papercraft, 3D models are made of edges and creases that can be unfolded to be completely flat. We printed, cut, and folded a bunch of papercrafts as a class, then reversed that process to better understand how one might unfold a 3D shape. Although challenging, students quickly intuited how this concept can be applied to their 3D models, thus preparing them to be textured.

To texture their newly unwrapped models, students explored one of Blender’s handy features that sets it apart from other modeling software. This is its Texture Paint mode - a feature that allows the user to directly paint onto the virtual model, as if they were hand-painting a sculpture. Students utilized this feature to apply colors and shading on specific areas of their models, including details such as scratches on metal, soft velvet patterns, inscriptions, and much more.

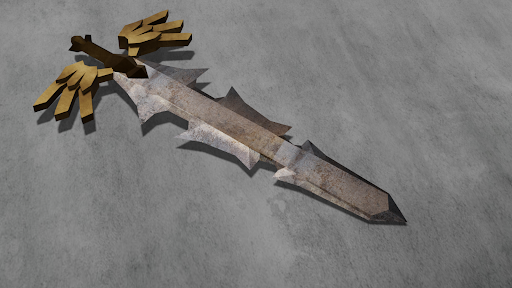
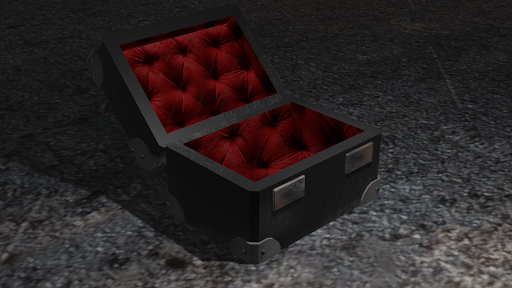
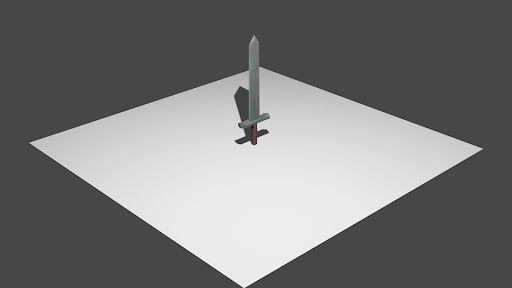
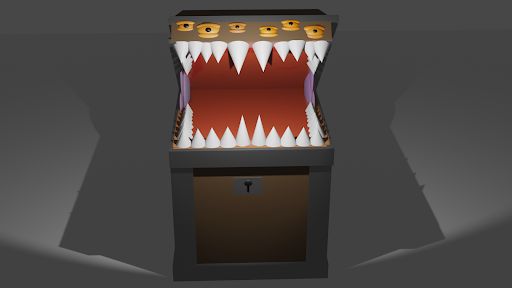
The third and final step of the process is definitely the most rewarding part of 3D modeling. Once our models were complete, we could very easily reuse them however we wanted. We explored various applications of 3D models, beginning with rendering out scenes featuring our props - these are the images that you see attached to this post. Blender, being an expansive package of many useful 3D-oriented tools, also has a built-in system for setting up virtual scenes with lights and cameras. After being textured, a 3D model can dynamically respond to light in your scene. For example, tweaking its metallic attribute would allow the model to reflect light and appear shiny, whereas lowering that value would make it appear more dull or rough. Depending on what type of material their model was supposed to be made out of, students decided on just the right settings for their props to prepare them for the final renders - all of which turned out spectacularly!
I was incredibly proud to see the level of polish and fidelity students managed to pack into their 3D artwork. As we near the end of the semester, I am very excited for us to dive into the next major application of 3D modeling - 3D printing. This is exactly what you might think it is; the process of “printing” out our 3D models into physical material. I hope that you will stay tuned and check out our gallery of excellent 3D creations when it comes time to proudly present them on Expo Day.
